Working With the Map
A story map holds two views of the same work: the user journey across the page, and the delivery detail underneath. Once you can read the map, everything else — planning, filtering, dependency checking — follows from it.
The three levels
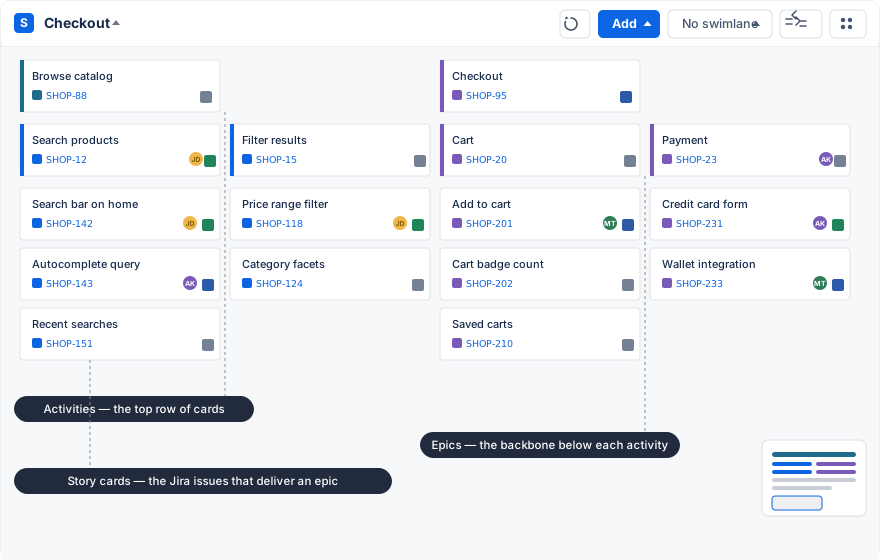
- Activities are the large steps of the user journey. They run left to right in the top row. An activity is a Jira issue whose type you chose in the hierarchy settings.
- Epics form the backbone under each activity. Each epic is one capability the product needs for that step.
- Story cards are the remaining board issues — stories, tasks, bugs — grouped under the epic that delivers them.
All three levels are rendered as cards. A card shows the summary on top; the bottom row carries the issue type icon, the issue key as a link, the assignee’s avatar, and a status square that you can click to transition the issue. Activities and epics have a colored edge that you can set per card — use one color per activity to keep large maps readable.
The toolbar
The toolbar at the top right of the map has five controls:
- Reload re-reads activities, epics, and issues from Jira. Use it if someone changed the backlog while you were working.
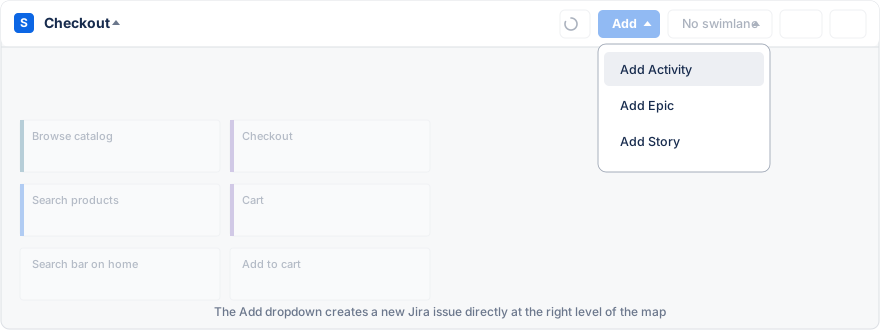
- Add creates or finds issues. The menu offers Add Activity, Add Epic, and Add Story; when a swimlane view is active it also offers Add Sprint or Add Release.
- The view switcher (labelled with the current view) changes how the map is organized. See below.
- Dependencies draws lines between issues that are linked to each other.
- Settings opens the map configuration: general, view, hierarchy, fields, and advanced.
View modes
The view switcher offers four ways to look at the same issues:
- No swimlane is the plain map: epics and their issues, grouped by activity.
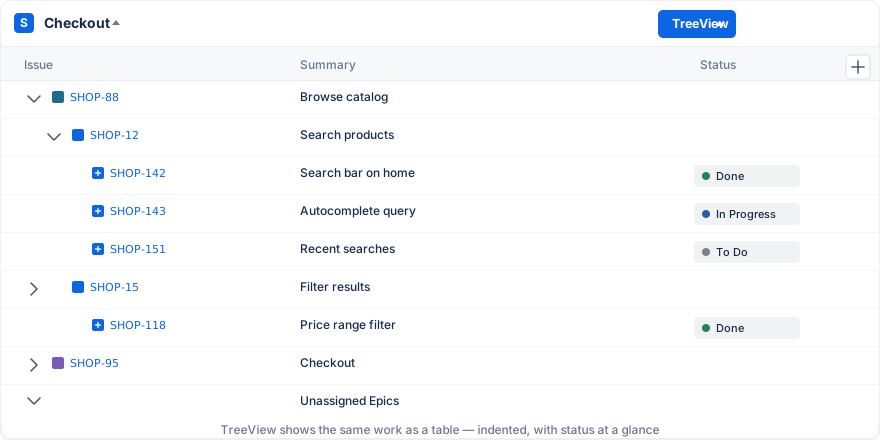
- TreeView shows the same work as a table with Issue, Summary, and Status columns, indented from activities down to issues. You can add report fields as extra columns and resize them; it is easier to read on large maps and works better with screen readers.
- Sprints adds a swimlane per sprint, with the active sprint on top.
- Releases adds a swimlane per fix version of the project.
Editing work
- Move an issue to another epic by dragging its card to the target column. The issue keeps its history; only the epic link changes.
- Reorder by dropping a card above or below another card. The order you set here is the map’s own ranking and does not change the board’s rank.
- Rename or edit by clicking into the card summary. Changes are saved to the Jira issue.
- Move an epic or activity by dragging it within its row. Epics can also be moved under a different activity.
If an issue seems to be missing, reload the map first. The map only shows what the selected board contains, so an issue on a different board will not appear.
Dependencies
Select Dependencies in the toolbar to overlay lines between issues. The lines follow a Jira issue link type — “blocks” by default, and you can choose any link type your site defines in the dependencies configuration. Each line starts at the source card and ends with a dot on the card it points to; linked cards get an amber border, and issues that have no dependency in the current configuration are dimmed.
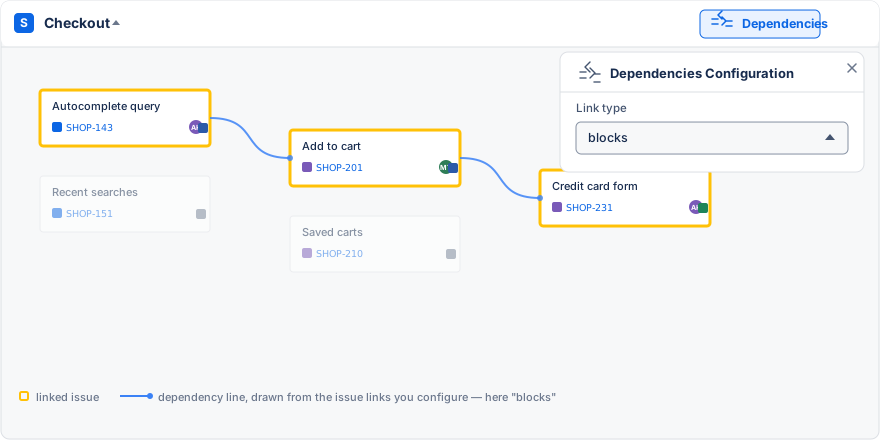
Dependency lines are useful in sprint view, when you want to check that a blocked issue is not scheduled before its blocker.
View settings
Under Settings → View you can hide finished work to keep the map readable:
- Hide columns whose epics are all completed.
- Hide completed epics, completed sprints, or completed releases.
- Reverse the order of release lanes so the next release is nearest.
Keep Jira and the map aligned
The map has no storage of its own; every item is a Jira issue and every change is a Jira change. If someone cannot see or edit an item, that is their Jira permission for the project, the issue, or the board. Avoid tracking the same plan in two maps unless the team is clear about which map leads.
A practical routine for planning sessions
- Agree on the user or outcome the session is about.
- Read the backbone left to right. Does it tell a coherent story?
- Add detail only where a decision is pending.
- Discuss scope and order before discussing dates.
- Move the agreed slice into sprint or release lanes.
- Review the backlog lane before closing, so unassigned work is a conscious choice.